I came across an old military field phone for sale in a junk shop and loved the look of the phone,. However, I wanted the phone to be functional in an interesting way and no just something to look at.
So after speaking to Mike, he gave me the brilliant idea of having the phone speak inspirational quotes. We discussed how we could go about doing this and decided to buy and mp3 module that could be triggered via a set of buttons on the phone.
So I took the MP3 module and soldered the speaker output pads to the handset of the phone, added some buttons such as play, next track/quote, pause etc. then I took an audiobook full of quotes and converted it to MP3 format, then separated each track with Audacity to have its own file which could be stored on a micro SD card and played on the MP3 module.
Nixie Clock Upgrade
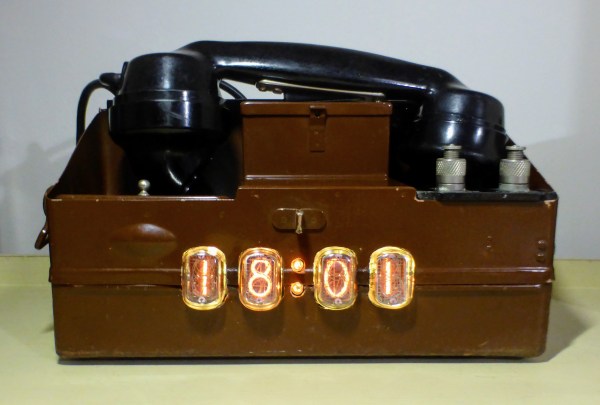
After making the quote speaking phone, I decided to take the project further by adding some front-facing nixie tubes soldered to a nixie clock circuit board purchased from eBay.
I made a template of the clock, taped it into position on the phone, then drilled and filed out the oval shapes that would fit the nixie tubes. Then I wired the MP3 module and nixie clock to one USB input at the back of the phone case so one power supply could be used for both functions.
A final check to make sure all cables and connections were well insulated and safe from touching the metal phone case and then the clock was fired up. It really does look great.
Our next meetup is Sunday 28th July. I shall be running a small workshop on how to use Neopixels and how to write code to control them using the Arduino or Raspberry Pi.
We are a group of creative technologists that meet every 2-3 weeks on a Sunday between 11am and 5pm for a general social and making session. Everyone is welcome to bring something down and work on it and share and get involved with members projects or to simply see what we are up to. There is no fee to join or attend any session.
Medway Makers is a place for creative people to get together to make things, learn new skills, make new friends, socialise, talk about ideas, watch people build things and generally be creative.
We have workshops in building cool things with Arduino and Raspberry Pi, learn about electronics, how to code for beginners, writing computer games for an Arduboy or other devices, designing in 3D CAD programs, 3D Printing, how to use a Raspberry Pi and so on. We have also done woodworking, making terrariums, painting and other creative activities.
Complete beginners welcome. No prior knowledge, skills or equipment is needed. Just bring yourself and your curious mind. We can provide laptops and equipment if you don’t have your own.
The best thing about all of this : IT’S FREE !!!
Medway Makers does not and shall not discriminate on the basis of race, color, religion (creed), gender, gender expression, age, national origin (ancestry), disability, marital status, sexual orientation, or military status, in any of its activities or posts. We are committed to providing an inclusive and welcoming environment for all our members and expect all members to do the same. Any person found to be acting in a discriminatory manner will be ejected from the group.
Note that meetings are held in either the Medway area or in Gravesend/Chalk area. We do not have a dedicated space (yet) and so are meeting at members houses until we do.
I’ve been working on a giant RGB LED Display recently. The video above shows you some test animations running through the display.
Currently the display is 25 x 17 in size and will be expanded to be 25 x 25 LEDs in total.
The display is made up of WS2812 Neopixel strips powered by a 20A 5v PSU. Animations are generated by Jinx! LED control software and then sent over WiFi using the tmp2.net protocol to an ESP8266 connected to the RGB strips.
The LEDs will have a grid overlaid on top of them to isolate each LED and finally a thin white acrylic layer will go on top to diffuse them. Keep an eye on this project for further updates.
So, over the last few months I have been curious as to the levels of pollution during my commute to work. I have to drive from the countryside of Kent into the Isle of Dogs, London, via the Blackwall Tunnel and at part of that journey I can literally taste the fumes from the other cars. I thought it would be interesting to try and see what the levels of particulates are plus some other air pollutants and so set of on a journey to build a sensor station with some relevant sensors for this task.
After speaking to Oly at Maidstone Hackspace, who had built something similar, I decided on the SPS30 particulate sensor and an MH-Z19 CO₂ sensor. I also added uBlox NEO 6M GPS module so that I could obtain accurate time plus the location of the device when in mobile mode. I also added an HTU21D temperature and humidity sensor. The entire thing currently looks like the prototype below.
Environmental Monitoring Station
Bottom middle is the microcontroller. I have used an ESP32, mainly as it is an ESP based device with plenty of GPIO pins. I needed a few for the various devices plus room for additional sensors in the future.
Right of that is the uBlox NEO 6M GPS module. Currently I am only extracting time and date from it but will also be capturing longitude and latitude data so I can record where the device was whilst in mobile mode.
Above the GPS modile is a HUT21D temperature and humidity sensor.
Above the ESP32 is a small golden box. This is the MH-Z19 CO₂ sensor. Left of that is a 2.2″ TFT display showing the various bits of data from the sensors. You can see I am displaying the PM2.5 and PM10.0 values as well as the CO₂ reading, temperature and humidity.
Above the display is the SPS30 particulate sensor. This was the most expensive sensor in the setup at approx £30 each. However, it comes highly rated and has excellent reviews. Above the SPS30 is a breadboard PSU as the ESP32 does not have enough juice to power all of the devices via USB.
I will be adding an SD Card reader/writer module soon to enable me to log the data to SD Card including the location of the device when on the move. At first, all of the data I was sending up to ThingSpeak to record and display it. This was fine to start with but I soon became frustrated with the very limited graphing and display options with ThingSpeak. I wanted the ability to be able to zoom in and out of graphs, which ThingSpeak does not offer. I then came across the open-source Grafana project which allows you to display your data in beautiful ways and has the option to annotate certain parts of the graph, change what date and time range to display on the graph quickly and easily as well as zoom in and out on whatever area you want at any time.
As I had a few spare Raspberry Pi’s lying around I decided to go down the route of self-hosting my own data and graphs. So I took a Pi, installed InfluxDB as my database to store the sensor data and also Grafana to display all of the readings. All of the above was pretty easy to set-up. There are plenty of tutorials online to assist you with this.
Grafana
I have to say I am very pleased with the results so far. As you can see above the Grafana dashboard looks amazing. You have plenty of options with regard to how the data is displayed and what colours to use, etc. It has been a very interesting experience to watch the levels of CO₂ go up and down in rooms that are occupied or not, or have ventilation or not. I have to admit I am more inclined to keep windows open since seeing the CO₂ readings go above 1000ppm on occasion. It is also seeing the levels of particulates go up into what is considered unhealthy ranges just by doing things like cooking. You can also tell when people are getting out of bed, moving around the house, etc. by the particulate levels as the settled dust gets kicked up into the air again. The whole project has been a real eye opener.
I have a whole bunch of the MQ sensors and intend on adding a few onto the sensor station, particularly those relevant to car fumes so I can use the device in mobile mode and take it in the car on a daily commute.
Overall this has been a very satisfying project and a real eye opener as I was totally unaware of the levels of pollution just inside my own home. I would recommend you, the reader, to also build one of these as you will be surprised at what you find. Give me a shout if you have any questions or need some help with your own project.
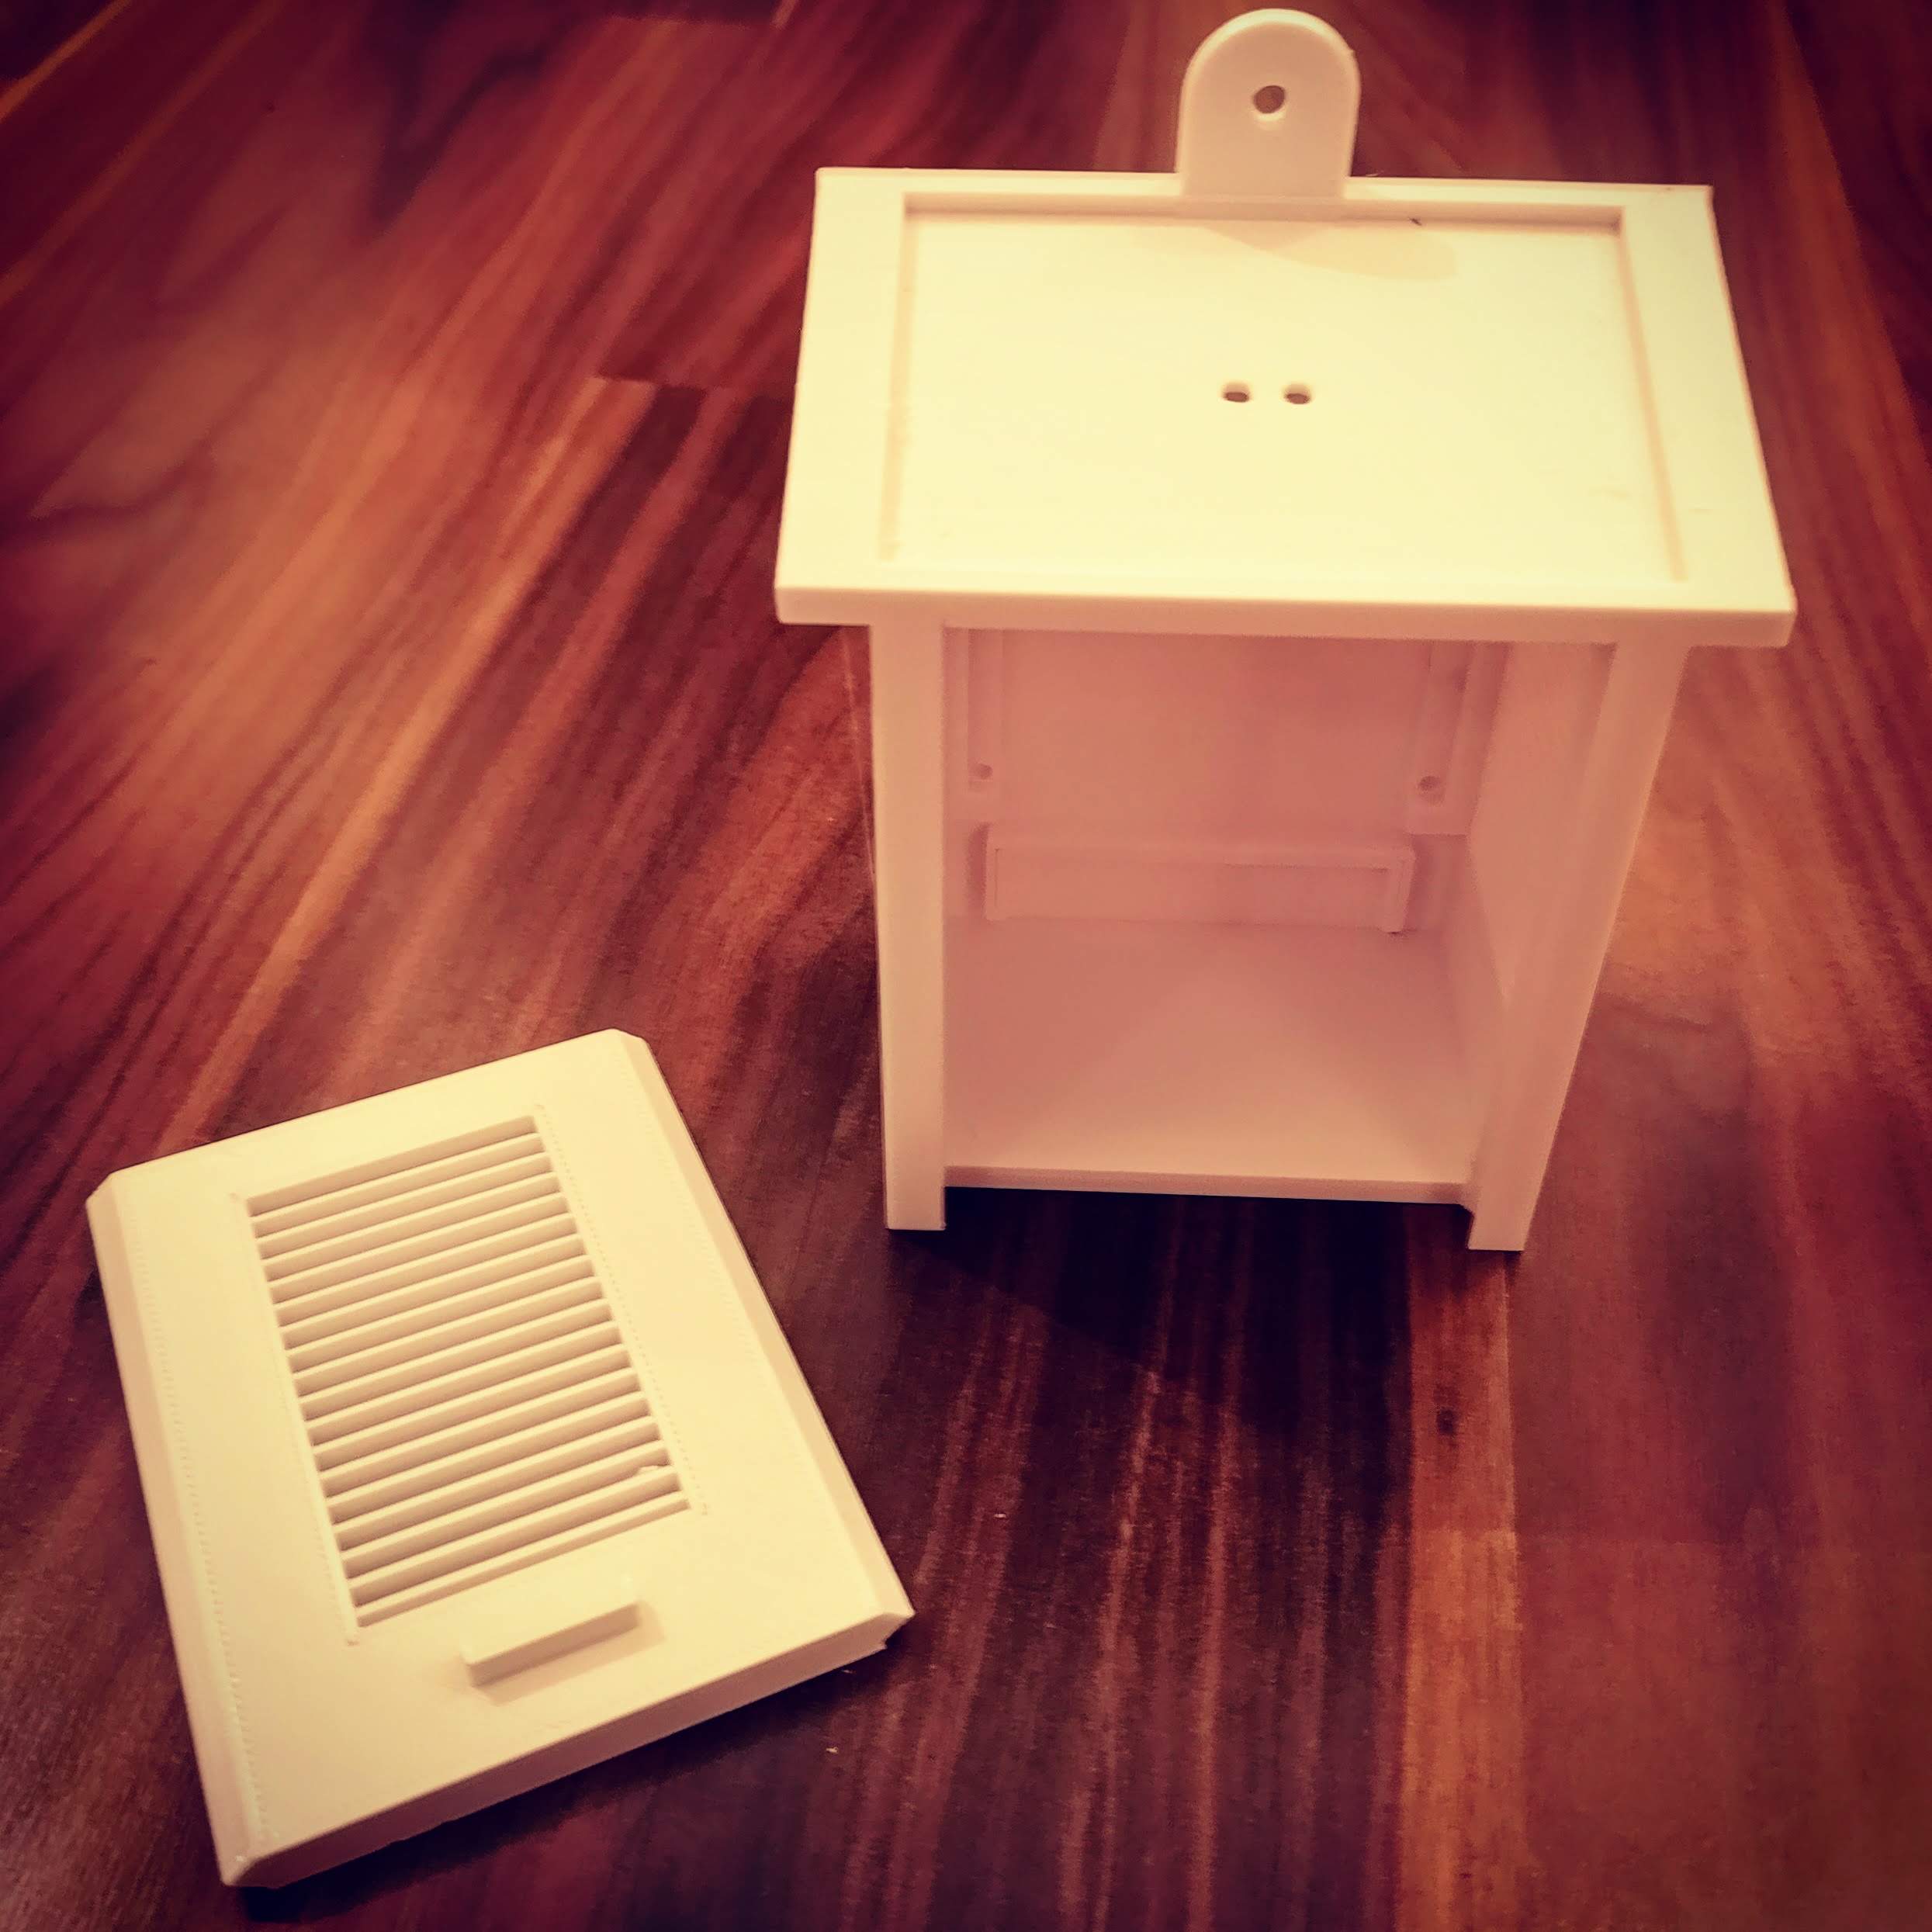
So, we have started work on a weather station to go out in our gardens. This is a collaborative project so anyone can join in at any time. To start with I have 3D Printed the small Stevenson Screen enclosure you see pictured below.
3D Printed Stevenson Screen
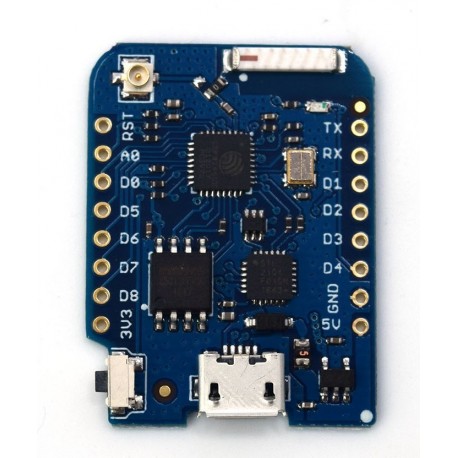
This housing will contain a Wemos D1 Mini Pro with external antenna. The Wemos D1 is an ESP8266 (or ESP12) based device. It is fully Arduino compatible and has wifi with external antenna.
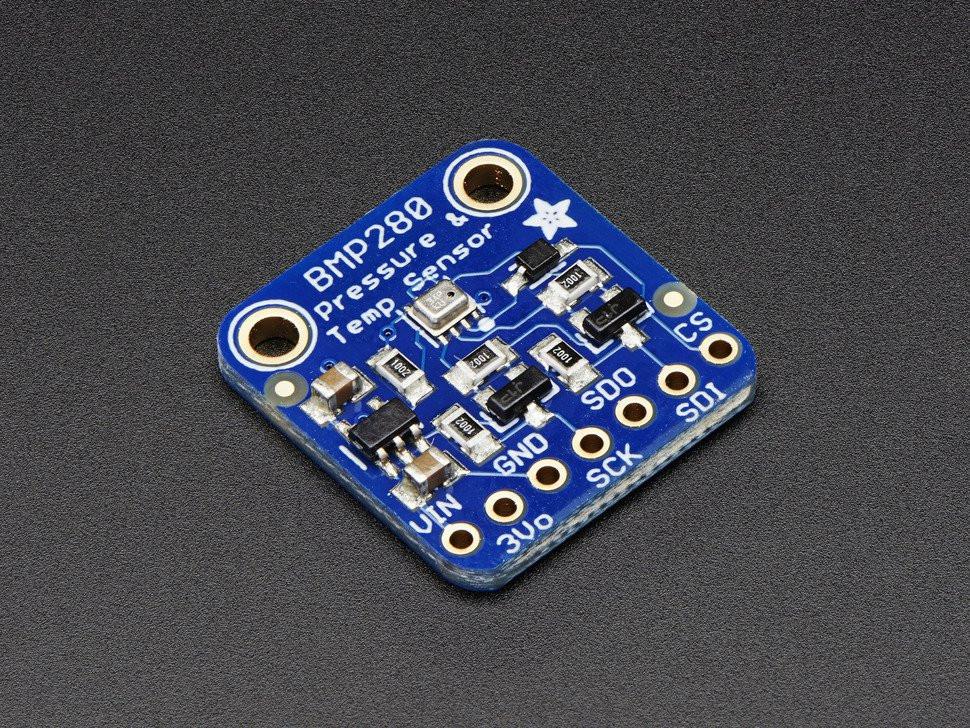
Connected to the Wemos will be the various sensors for the weather station. To start with we have added a BMP280 which is a combined temperature, humidity and air pressure sensor. The data from this sensor is being sent over wifi to both ThingSpeak and also an app created in Blynk to show the various readings.
Blynk App
Over time we will add various other sensors, such as wind speed and wind direction. I already have a few ideas how to build these using magnets and hall effect sensors.
Also, we will add rain gauges, UV, light, plus some environmental monitoring sensors such as CO2, dust particles and so on.
I shall blog about updates to this project as we go. It will no doubt take up to 6 months to complete.